 knacksnews
Learn Video Stabilization in DaVinci Resolve Like a Pro
Shaky footage is one of the biggest frustrations for video editors. Whether you're filming handheld or dealing with unpredictable movement, jittery clips can make your project look unprofessional. Fortunately, DaVinci Resolve provides powerful stabilization tools to help you achieve smooth, polished footage without the need for expensive equipment. In this guide, we'll break down the entire stabilization process in DaVinci Resolve and offer practical tips on how to get the best results.
Understanding Video Stabilization in DaVinci Resolve
Before diving into the stabilization process, it's important to understand how DaVinci Resolve handles shaky footage. Stabilization works by analyzing motion in a clip and applying corrections to reduce unwanted movement. The software offers different stabilization modes, each suited for specific types of shake:
Perspective: Re-tunes the complete frame, aligning for pan, tilt, zoom, and rotation. Complex movements are no problem with this mode, though it can result in distortion. If your camera work contains large amounts of dynamic motion, experiment with this mode cautiously to confirm that it's not distorting the image beyond recognition.
Similarity: A lightweight version of Perspective that adjusts pan, tilt, zoom, and rotation without distorting the image. This is an excellent choice if you want to stabilize small shakes while keeping their natural appearance.
Translation: Focuses only on pan and tilt movements, making it useful for subtle shakes without affecting the entire frame. If your footage involves only minimal jitter, this mode can provide stabilization without drastically altering the image.
DaVinci Resolve also allows you to control additional stabilization settings, such as cropping ratio, smoothness, and zoom. The key is to experiment with these settings to find the best balance for your footage. Over-stabilization can sometimes make the footage look artificial, so fine-tuning is essential.
Stabilizing Footage in the Edit Page
The Edit page is the most straightforward way to stabilize a clip in DaVinci Resolve. Follow these steps to quickly smooth out shaky footage:
Import Your Footage: Drag and drop your video file into the timeline.
Select the Clip: Click on the clip that needs stabilization.
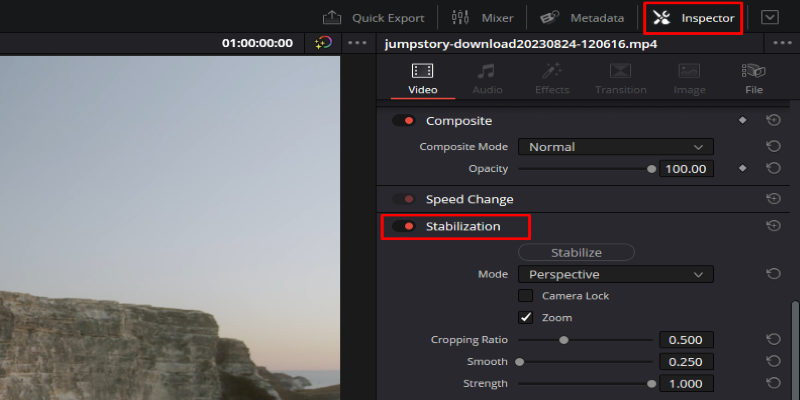
Open the Inspector Panel: In the upper-right corner of the Edit page, click on "Inspector" to reveal clip properties.
Access Stabilization Settings: Scroll down until you find the "Stabilization" section.
Choose a Stabilization Mode: Select between Perspective, Similarity, or Translation.
Fine-tune the Settings: Adjust parameters such as Camera Lock (which removes all motion), Zoom (which automatically crops to avoid black borders), and Cropping Ratio (which determines how much the image can be cropped).
Click "Stabilize": DaVinci Resolve will analyze the footage and apply the stabilization algorithm.
The process may take a few moments, depending on the length and resolution of your clip. Once completed, play the clip to check the results. If necessary, adjust the settings and reapply stabilization for better performance. If you notice distortion or over-cropping, consider reducing the stabilization strength or using a different stabilization mode.
Using the Color Page for Advanced Stabilization
While the Edit page method is effective, the Color page provides even more control over stabilization. This method is particularly useful for clips with complex motion, as it allows you to refine stabilization settings for precise control. Here's how to do it:
Navigate to the Color Page: Click on the "Color" tab at the bottom of the screen.
Select the Tracker Tool: In the middle section, find the "Tracker" panel (it looks like a target symbol).
Switch to Stabilizer Mode: Click on the "Stabilizer" option within the Tracker panel.
Customize the Settings: Choose your stabilization mode and tweak parameters like cropping ratio, zoom, and smoothness.
Apply the Stabilization: Click "Stabilize" and let DaVinci Resolve analyze the footage.
Since the Color page is primarily used for color grading, using it for stabilization can be an advantage if you are already working on color correction. You can stabilize a clip and immediately adjust its color, ensuring consistency in your post-production workflow. This advanced method is ideal for professional editors looking for extra precision in their stabilization process.
Best Practices for Effective Stabilization
While DaVinci Resolve’s stabilization tools are powerful, they work best when combined with proper shooting techniques. Here are some tips to help you achieve the best results:
Shoot with Stabilization in Mind: If possible, use a tripod or gimbal to minimize excessive movement. Even small adjustments to how you hold your camera can reduce the need for extreme stabilization in post-production.
Use the Right Mode: Different clips require different stabilization modes, so don’t be afraid to test multiple options. A mode that works for one clip may not be ideal for another.
Avoid Excessive Cropping: High stabilization strength can result in aggressive cropping, which may reduce image quality. Always preview the stabilized clip and adjust cropping settings as needed.
Check for Warping: Some stabilization modes can introduce distortions, especially if the footage has a lot of movement. If you notice unnatural warping, try reducing the stabilization intensity or switching to a different mode.
Experiment with Camera Lock: Enabling Camera Lock can create a locked-off shot effect, but it may not work well for all scenes. This option is best used when you want a completely still frame, but it can make dynamic footage look unnatural.
Conclusion
DaVinci Resolve makes it easy to stabilize shaky footage, whether you're a beginner or a professional editor. By using the built-in stabilization tools in the Edit and Color pages, you can smooth out unwanted camera movement and enhance the overall quality of your videos. The key is to experiment with different settings and modes to find the perfect balance for your footage. Additionally, alternative methods such as manual keyframing or third-party plugins can further refine stabilization when needed. Understanding how to stabilize video effectively will save you time and improve the overall quality of your projects. With patience and practice, you'll be able to transform shaky clips into cinematic masterpieces with ease.
Related Articles

Which Are The 5 Best Data Collection Tools to Streamline Your Research Process

How Can I Find the RSS Feed of a Website?

Creating OneNote notes from Notion databases

Learn to Convert SQL Data to JSON Format Easily Using Free Tools

Best Free Online Tools to Resize Images in Bulk Without Quality Loss

Top 5 Media Converters for Mac – Fast and High-Quality Conversion
Uptime Monitoring With Better Stack

Tools in the Cloud: The Future of Work Made Simple

How to Change Video Frame Rate: 5 Best FPS Converters

Edit MP4 Metadata Like a Pro: 3 Best Editors You Must Try

Improve Your Connectivity: 5 Best WiFi Analyzer Apps